In my years I did many tasks, including scooping ice cream, blending frozen drinks, baking fresh waffle cones, and making cakes. So today, I thought I'd share a bit of that knowledge with you.
Have you ever wished you could make an ice cream cake? Ever wished you didn't have to spend so much money for an expensive one at the fancy ice cream stores? Well, now you can do it yourself!

I warn you though, I never decorated cakes. I just did the basics, and the cake decorator did the fancy stuff.
Let's make an Ice Cream Cake!
What you'll need:Ice cream (I used 4 pints for this cake)
2 circular cake pans
Cake layer ( brownies usually work the best, but you can use whatever you want)
Frosting (Buttercream or whipped - we used to use Pastry Pride as a lighter option)
A flat knife
Fun decorating toppings
Plan for this to take at least 24 hours.
- Let your ice cream soften a bit so that it's scoopable.
- Fill cake pan with ice cream ( you can do it all in one pan, and freeze between each layer, but I recommend using one pan for each layer to save time).
- Spread the ice cream in the pan so it's flat.
- Put layers in freezer (you want to put the cake in the freezer between each step to help it keep it's shape, otherwise it becomes a goopy mess).
- Bake ahead of time brownies, cookies, or whatever you want to be your cake layer.
- Cut thin slices of brownie and place on top of each ice cream layer.
- Put layers in freezer to let the ice cream adhere to the brownie.
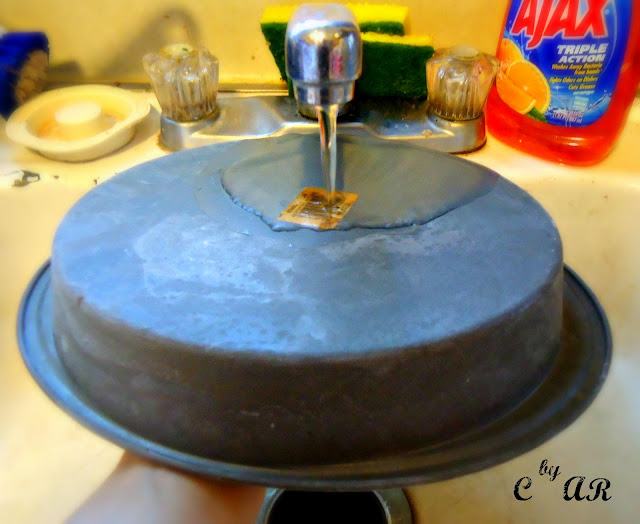
- After it has COMPLETELY FROZEN (usually overnight) , it is then time to take it out of the pan.
- Flip your cake upside down and hold one hand underneath it.
- Run cold water over the top of the pan.
- With your other hand gently twist and loosen the pan from the ice cream.
- As soon as you start to feel it start to come loose, remove from under water.
- Be ready with your plate, still keep your hand underneath, and as the cake slides out of the pan, quickly place on cake plate.
- Repeat with second layer.
- Each layer should be pretty solid, so you can adjust each layer's placement if need be.
- Place cake in freezer to reharden.
- Next, it is time to frost your cake.
- Using a flat knife to spread your frosting, start with the sides first.
- Then move to the top, and spread frosting on top, smoothing out the edges.
- If at any point in this process, you feel like the cake is starting to loose shape, put in freezer. Once it begins to harden again, you can then continue to frost.
- Put in freezer to let the base frosting set before decorating.
- Decorate! Have fun with it... even if you aren't a cake decorator, you can use things like brownies, cookies, sprinkles, or candy to fancy it up.
- DO NOT let cake soften before serving. Instead take a knife and dip in hot water before slicing.

SERVE and ENJOY!!!!
I'd love to see what you guys come up with! Post your masterpieces in the Creations from Alisha Rose and Friends Flickr Group .


I learnt a new way to decorate my brownie cake. My daughter would love this idea. She often craves for ice cream cake that has chocolate.
ReplyDeleteI hope you try it. I'm sure it would be great with gluten free brownies!
DeleteIce cream cakes are my favorite! I have never made one before, but your instructions make it look easy enough. Thanks for linking up with Hump Day Happenings!
ReplyDeleteI'd love to hear if you try it! Thanks for hosting an awesome linky party!
Delete