Pages

Wednesday, August 29, 2012

Orange Sherbet Tee: Tutorial

Today I'm bringing to you my first official tutorial and... drum roll please... free pattern. The pattern is approximately for size 12 months. It fits my little girl who is 32 inches and 21 lbs, so if your child is that size feel free to download the pattern, if not just follow along by using a shirt that fits your child well.


What you'll need:
  • 1 yard of knit fabric (I used a remnant, so you'll probably actually be using  less then a yard) (for some tips on knits check out my post: Yoga Skirt: Maternity)
  • Double fold bias tape (extra wide is probably easiest)  ( note - I used woven bias tape with knit fabric. You have to be a bit careful not to stretch out the fabric as you pin and sew it.  I've heard that there is knit bias tape which may work better, but I've never tried it and don't know where to even find it)
  • Orange Sherbet Tee Pattern   (If your child is a not a shorty like mine, you might want to add a little bit of length to the bodice) (Be sure to print with no scaling.  There is an inch test box to make sure it printed correctly)


Start by turning your shirt inside out, and fold in half to make the body of the shirt. Trace around leaving extra seam allowance for the shoulders and the sides.  Don't worry about the neck line because we will be closing that in with bias tape later.  (I think I forgot to do this when I was tracing the pattern, because I later had to cut the neck line in an extra inch)

Trace around your sleeve, placing the top of the sleeve on the edge.  Later we will be placing that part on the fold.  Notice how I added extra space  on the bottom part of the sleeve.  This is because I wanted to have extra so I could gather a bit and have the sleeve a little ruffly.  (If you decide not to use a knit be sure to give a bigger hem allowance so that you can fold the exposed edge under or you could just surge or zigzag)


Cut out on the fold two of the bodice, one for the front and one for the back. Cut out two of the sleeve.


While the back bodice piece is still folded in half, cut about four inches down into the neck line. This will be for the keyhole closure.


Put the two bodice pieces right sides together and sew the shoulder pieces together. Iron your seams open. Don't worry about finishing any of these edges because we are using knit and it won't fray.  If you are not using a knit be sure to surge or zig zag your edges. 


Take the sleeve and fold over the straight edge for the hem.  Again not worrying about the edges because knit won't fray.   (In my pictures, I didn't hem it before attaching it to the shirt.  Ignore this.. and do it before attaching.. I'm really not sure why I did that...I think I was just being lazy. ) If you're not using knit, again be sure to surge or zigzag your edges BEFORE hemming.

I used a double needle on the sleeves.  I've never used a double needle before and I totally liked the look of it.  I then BROKE the double needle, so had to do the bottom hem without it.  :(


Take the rounded longer edge and sew a basting stitch. Gather the sleeves until they are the right length to fit the armholes.


Pin to shirt and sew.  When you turn it inside out, your shirt will have cute little sleeves like the picture below.


This is what your shirt will look like before sewing together... already it's looking like a cute little shirt.  :)


Turn it so right sides are together and sew down the sides.  You'll also have a little bit of the sleeve that is raw, so you'll want to sew that together too. Continue from the side and end your seam at the sleeve hem.


Then take your bias tape and pin it around your collar.  If you are like me, just sandwich the shirt inside of the bias tape (  I found out this is officially the cheating way ). If you sandwich it, just make sure the smaller side is on the outside of the shirt so that when you topstich it on, it will catch the side underneath.  If you would like, use the real way and unfold it to sew. (Here is a good tutorial on that: Sewing on bias tape by MADE)   I had this cute vintage bias tape which I wanted to use.  It was soooo small and really hard to sew on, so I would advise using the extra wide bias tape. 


Take a second piece of bias tape and put it around the keyhole.  I didn't do this, and used  two more pieces, one for each side of the keyhole and ended up having to cover the exposed bottom of the keyhole, so yours will come out looking better then mine.

Then take a piece of elastic and fold it like below.Sew together, then attach it to the back of one side of your keyhole opening.


Sew on a button on the other side of the keyhole where the the loop hits and you should now be able to button your shirt closed.


Hem up the bottom of your shirt and you're done!


You now have a cute little shirt for your little girl to wear. :)


Hope you were able to follow along and I didn't confuse you too much.  :)  Happy sewing!

Friday, August 24, 2012

Meatless Dish: Parmesan Artichoke Pasta

Here is another yummy dish without meat. It had artichokes in it, so I was immediately drawn to it.  It cooked up really easy.  Just a little bit of sauteing and then pour over your noodles, sprinkle with cheese... and done. 


And it has wine.. I mean, what recipe isn't great that has wine in it?    I always pour myself a little glass while I'm cooking.  It kind of makes the whole cooking process more of a relaxing experience.  I always feel a bit fancy.  :)


The recipe called for shallots, but I didn't have any.  I just used onions, and it was still good.  Also I cut down on the cheese from 1/2 cup to between 1/4 and 1/3.  Then I just put the cheese out on the table for anyone who wanted to add a bit more.  I thought it was just right even with the reduced amount. I also used dried parsley instead of fresh.  I'm sure fresh would be better, but I used what I had. 


It had a nice garlic flavor to it, it made you just want to keep eating more and more of it.  Artichokes, garlic, wine, cheese... what could be better?
Go ahead, try it, you'll like it! 

Parmesan Artichoke Pasta by Laa Loosh


Tuesday, August 21, 2012

Boy Romper: Cars and Trucks

One of my best friends was expecting a boy and I knew I wanted to make her baby something extra special.  I recently had picked up a bunch of patterns on sale, and totally fell in love with this one.  The romper looked just adorable.  I picked out some absolutely cute fabric.... there actually were very few boy choices, so I got lucky finding something so awesome. 

McCall's  M6309

The pattern was pretty simple to follow.  Though there was a part here and there that the picture showed something different from what the actual instruction said.  It kind of seemed like maybe it was translated from another language and just wasn't translated quite right.  Some of the sentences just didn't seem to make sense.  The pictures seemed really clear though and helped me figure out what to do. Overall,  I would recommend this pattern.


I was going to just do it all in the  main fabric, but then my friend who was sewing with me suggested I do the straps and the pocket in a solid color so it would stand out. I searched in my stash and found this denim.  With red thread and buttons, the denim with the truck fabric made a great combination!


I choose the medium size which turned out a little bigger then I thought.  It actually fit my 12 month old little girl.  So it'll fit him next summer, which is actually perfect because he'll be able to wear it when it's hot out and he'll hopefully be able to wear it for a while.


I made a few bibs to go with it, wrapped it up and sent it in the mail.  My friend got it this Friday, just in time, because she had her little boy just a little after midnight on Sunday.  So excited to welcome to the world their new little one! I can't wait to meet him!

Friday, August 17, 2012

Card Series: Post 14

So apparently I missed a week.  I spaced it out completely.  I think we'll be winding down the card posts for a bit. Maybe one more post next week and then I'll take a break with some random crafts for a bit.  We'll see where we go from there.  This week's card post  is largely themed from father's day and is dedicated to my dear husband who got to celebrate his first one this year.  Thanks honey for being such a great daddy to our little girl!

Birthday

Father's Day

Father's Day

Birthday

Father's Day


See you next week!

Tuesday, August 14, 2012

Sewing Date and Sneak Peek

So I recently had one of my good friends over and we had a little sewing day.   She brought her sewing maching and we did our projects together.  When the baby was awake, we took turns sewing and being on babysitting duty. It was fun... and we both got a lot done.


I've been finished with the project for a while now... and I've been dying to show you guys.  The only problem is, it's a present for one of my best friends. And when said best friend is one of the few followers of this blog and actually reads it on a regular basis, it kind of ruins the suprise when I post it before I actually send it to her.  I'll be putting it in the mail this week, and once she gets it, I'll finally be able to show you pictures of it! 

Below is a little sneak peek.  


The other awesome thing from the sewing weekend was that as I was doing this pattern, I was reading the different options for finishing and thought I'd try the overcast option.  Absolutley LOVE the way it looks... way better then a zig zag.  It looks nice and clean and still keeps it from fraying.  Woo Hoo!

Also if you look closely at this next picture, you can kind of see the design of the fabric I'm using.  I'm totally in love with the fabric.   I liked this pattern a lot and I think the fabric is so cute, it makes me want a boy just so I can make another one!

Stay tuned...  I've got a bunch of new projects that I've been doing, and I'm excited to be able to show you them soon. 

Monday, August 13, 2012

Cooking Tips: The Art of Steaming - Artichokes and Fish

So when I think of steaming a food I think of steaming the bags of frozen vegetables or plain old fresh vegetables with no flavor at all. 

But today I wanted to share with you a couple of fun other ways you can steam your food that is much more exciting. 

One very yummy dish is artichokes.  Aren't they pretty?  I just love them.   I've always liked artichokes, but a while back my friend gave me a cookbook which had a easy recipe that is so delicious that I've never gone back.  (The book is so fun, it's a great way to have a date with your spouse without ever leaving your kitchen!)


Dinner Dates by Martha Cotton


Adapted from Dinner Dates by Martha Cotton

1. Chop off the prickly top of the artichoke.  You want to be able to access the inside leaves. 
2.  Next peel several cloves of garlic. Slice them and put one slice inside each leaf.   This is absolutely heavenly if you like garlic.  If not.. skip this step.
3.Place your artichokes in a pan and fill it with about an inch or so with water. 
4. Drizzle with olive oil, and sprinkle with salt and pepper. 
5. Take two pieces of foil and create a tent, with a slight hole at the top to let a little steam escape.
6. Bring to a boil and then turn down to a simmer.  Cook for about 45 minutes.
7. Serve with dip of your choice.  We just melt a little butter and use that, but some people use mayonnaise too. 
8.  Enjoy!


The other thing I recently discovered was an incredibly easy way to cook fish.  I always hated cooking fish because it always made the house smell. Blech!

But when I added fish to my diet at my doctor's recommendation, I went in search of a way that I would like.  I actually asked the lady at the fish counter and this was her advice.  She was so right, it turned out great!  (Technically, this might be called poaching...)

1. Before cooking the fish fillet, you can let it sit in a marinade for about a half hour. 
2.  Put fish in pan, skin side down.
3. Fill pan with about an inch of water or liquid of your choice. I will use broth sometimes.
4.  Once fish starts to bubble, turn it down to a very low simmer.  You do not want to overcook it - it should not be boiled at all. 
5. Cover with lid and simmer until fish turns color.  It should be 5-7 minutes... Maybe 10 max. 
6. Test with a fork, it should pull away easily and be flaky.
7.  Remove from heat. Flip fish and peel off the skin. 
8. Serve and eat up!  It is usually good with rice and veggies on the side. 

Both of these dishes are quite easy and yummy.  Once you put it in the pan, you just let it do it's thing... and the best part, very little clean up!

Tuesday, August 7, 2012

Baby Shoes

A little while ago, I found this tutorial for baby booties.  I thought it would be a fun addition to a gift for a baby girl.

Modern Baby Bootie Tutorial by Tao of Craft

Before I gave it as a gift I wanted to try it out with scrap fabric.  I wanted to make sure I understood the directions before I tried making it for someone else. 

The directions looked fairly easy at first, but as I was going I found that they were actually a bit confusing.  I will try to tell you what I figured out, so that you can avoid the being confused part. 
This first picture is the final product of the first attempt.  It was finished after working at it a couple of hours.  I had to recut, resew and pick stuff out.  By the end I was a bit frustrated, but finally figured it out.


This next picture is the second attempt which I was able to give as a gift.  The second pair probably took me less then 15 minutes.  Once I figured it out, it was actually quite easy. 

The two problems I ran into were:
1.  The picture shows the lining being seamless.  While this is not possible, however, it is possible to make it so the lining looks just as nice as the outside with all seams inside.   Skip step 4... do not sew the lining sole to the actual sole.  What you want to do is sew the right side of the lining sole to the right side of the lining U.  Then sew the right side of the sole to the right side of the top U.  Leave a little hole when you sew the two lining pieces together so that you can turn it inside out. 

If this does not make sense... there is a comment near the very bottom of the tutorial by a Susan W which helps explain it.  I am not sure if I did what she said either, but it helped me figure out what to do.


2.  The second problem I had was that the first picture showed sewing the Velcro on first, and then in the consecutive pictures it doesn't show the Velcro, so I assumed the Velcro was on the other side.  I followed what I thought was the right way, and my Velcro ended up on the wrong side.  I never actually did figure that part out.  I ended up just sewing on the Velcro last. Every time I tried to picture it and sew it where I thought it went, I would visualize it backwards and it would still wind up wrong. 


Also, I had never used interfacing before because I didn't know what it did.  I didn't have any on hand so I skipped that part.  Now that I have actually used interfacing and understand how it works, I would recommend using it because it will make your shoe a lot sturdier.

 I also didn't know what topstiching was either, and while you could probably skip it, it would probably give your shoe more shape, and keep the lining in place.  It would also give it a more finished look. 

Ha ha.. just writing this, I've realized how much I've learned in just a few short months. 

Monday, August 6, 2012

Card Series- Post 13: Colors and Patterns

Another thing to think about when making a card is how the different colored and patterned paper coordinate together.  One thing to avoid is having too many loud patterns going on at once.  It becomes too much too look at and can make you a bit dizzy.  On the other hand,  too many plain colors can be very bland and boring.  One thing you have to consider also is having a light enough background underneath your sticker to be able to read the words.  Often times I will put a light color or subtle pattern underneath a quote and then cut out a brighter slightly larger shape to help frame it.  If my main card background is bright and loud,  I will usually use more solid colors and subtle patterns for the other pieces.  If the background is lighter or more plain, I will make the other pieces with bright pops of color or loud patterns.   It's just playing with the balance while still making it interesting to look at. 


Birthday - Mother

Birthday

Welcome Baby

Mother's Day

Mother's Day

Do you have a favorite color or pattern that you love to use? Stripes, zebra, flowers, or chevron?  Or how about pinks, blues, or purples?

Come back next week to see more cards!


Friday, August 3, 2012

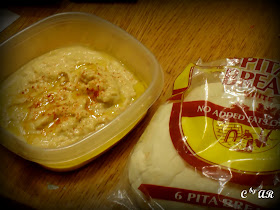
Snack Time: Hummus

Another yummy but healthy snack that I discovered recently is hummus.  It is totally quick and simple.  As I researched how to make it, I came up that every recipe has the same ingredients in common.  The main difference is the proportions.  You can basically adjust the proportions based on your personal taste.

Make sure you have these ingredients in your kitchen:

Garbanzo beans (aka chickpeas)
Tahini (it's like peanut butter, but made out of sesame seeds)
Lemon juice
Garlic
Salt and/or pepper
Olive oil

I'll give you the basics here, but I would still recommend looking up a recipe with the particular proportions that sound good to you, so that you have a basis where to start.  I've also seen a few variations with extra ingredients, so you might want to try those too. I've tried a few different ones, and then still ended up tweaking it a bit to what tasted good to me.


Mix all ingredients except for the olive oil in a blender or food processor. Transfer to serving dish, then drizzle with olive oil.   Garnish with topping of your choice,  I think I used paprika here.  Other options are parsley, or pine nuts.    Serve with pita bread or veggies. I suggest you give it a try, it's easy peasy, quite delicious and even good for you.